Hey everyone, here is the third and final instalment of my "Post Apocalyptic Corporate Headshot" series of the "The Shot," "The Shoot & The Gear," and "The Post."
Here's the video that shows how I created this image in Photoshop.
Cheers!
DC

Showing posts with label Post Processing. Show all posts
Showing posts with label Post Processing. Show all posts
Sunday, December 20, 2015

Sunday, September 13, 2015
"The Post" - Part 3 - Milky Way Over Nelson
Hey everyone, here is the third and final instalment of my Milky Way over Nelson series of the "The Shot," "The Shoot & The Gear," and "The Post."
Here's a video on how I post processed my Milky Way images. Really simple processing using only Lightroom.
Cheers!
DC
Here's a video on how I post processed my Milky Way images. Really simple processing using only Lightroom.
Cheers!
DC
Saturday, May 16, 2015
Lightroom Exposure Recovery Tutorial

Do you have a horribly underexposed photo? Not much of an issue for Lightroom. This was my experience with one of my photos from our trip to Hawaii earlier this year. This video tutorial shows how I got to the after version.
Cheers!
DC
Sunday, April 26, 2015
Project Feline - Part 3 "The Post"


Welcome back to Part 3 of Project Feline, "The Post." The post processing in these photos was so simple, and it was all done in Lightroom (at time of process was LR v5.7). Below are the screen shots of my settings, where I started and how I moved from one shot to the next.
The first shot is my reference image with a grey card in order to set a correct white balance. With 2 cats that are black and white this was an important first step. All I did with this was grab the white balance eye dropper tool inside the Basic panel and clicked on the grey card...simple and straight forward.

Next all I had to do was sync this white balance setting across all of my photos, which is as easy as selecting the reference image, the grey card shot with the WB adjustment, then selecting my target images that I want to sync. When you do that the Sync button shows up at the bottom of the LR Develop panel. Click Sync and then choose the settings you want to sync, in this case WB (I also kept the Process Version checked to ensure the same version is used) then click Synchronize and you're done.


So then I went to my first image to edit. The first thing I did was some cropping and then a few simple adjustments in the Basic and Detail panels. You can see all of the settings below.


Now I used the Sync feature to match the WB setting across all images to start, but after that I tend to only focus on editing one photo at a time, so I don't usually sync all settings across all photos the same way. What I do use is the Previous button (see red arrow in the image above). When I move to the next image that I am focussing on I hit Previous, which applies all of the settings from the previous image to the one I'm working on. From there I make any additional adjustments that I think are necessary and then move onto the next image. In this case the cropping had to change for each, and I made a few small tweaks to the other sliders as necessary. My goal here was consistency across the shots as they were all companion pieces.
Basically this was it for post processing. Really simple touch ups that took about 2 minutes or less per image. Lightroom is some powerful stuff.
Thanks for dropping by again. I hope you enjoyed this instalment of "The Shot," The Shoot & The Gear," and "The Post."
Cheers!
DC
Monday, March 2, 2015
Ghost Town - Nelson, Nevada (Part 3 "The Post")
The third, and final part in this series is the "The Post." The following video tutorial walks through how I created the final image. It goes from Lightroom to HDR Efex Pro 2 over into Photoshop CC, and back into Lightroom.
Cheers!
DC
Cheers!
Sunday, May 6, 2012
Lightroom Sharpening Quick Tip Video Tutorial
Here's another video tutorial with a quick tip on how to use Lightroom's Sharpening tool to dial in the right amount of edge sharpening and avoid having too much sharpening in the overall image. Great little tip for quick edits or quick portrait retouching.
Enjoy!
DC
Enjoy!
DC
Sunday, April 1, 2012
Video Tutorial - Overview of Nik Software's Viveza 2
This is the next instalment of my video tutorial series. In this video I provide an overview of Nik Software's Viveza 2 plugin. Easily one of my favourite plugins for Lightroom and Photoshop.
Enjoy!
DC
Enjoy!
DC
Sunday, March 18, 2012
Video Tutorial - Lightroom Post Crop Vignette Tool
I've been pulling together some basic video tutorials that focus on my workflow and some of the tools that I regularly use. The first one produced is a tutorial on Lightroom's Post Crop Vignette Tool.
Enjoy!
DC
Enjoy!
DC
Saturday, February 25, 2012
Snapseed for iPad - Quick Review
I thought that I would do a quick overview of Nik Software's Snapseed app for the iPad. I was a late adopter of the iPad 2; however, I had heard a lot of good things about Snapseed. It was Apple's iPad app of the year for 2011, which says a lot. But even without that accolade the fact that it's from Nik Software should tell you that this is one powerhouse of an app. It's normally $4.99 in the App Store, but I was lucky enough to spot a few Twitter posts on Valentines Day indicating that it was free for on that day only, so grabbing it was a no brainer. But still, $4.99 is a steal for what you get.

So here's a quick overview of what you'll find with Snapseed:
Auto Correct - no thinking required - auto colour and contrast adjustments
Selective Adjustments - talkin' bout control points here...on your iPad... very cool... brightness, contrast and saturation (wish there was a structure option here, too, but alas not yet)
Tune Image - brightness, ambiance, contrast, saturation and white balance
Straighten - self explanatory
Crop - self explanatory
Details - sharpening and structure (both are global adjustments - would love to see these as selective adjustments in a future update)
Black and White - brightness, contrast and grain (combine this with the selective adjustments and you get a mini Silver Efex Pro 2)
Vintage Films - variety of styles and textures along with adjustments for brightness, saturation, texture strength, centre size (vignette), style strength
Drama Filter - variety of styles with filter strength and saturation adjustments
Grunge Filter - styles that range from 0 to 1501 plus texture options, centre size (vignette) that can be placed anywhere also includes brightness, contrast, texture strength and saturation adjustments
Centre Focus - like a vignette with blur where you can control the size and placement
Frames - variety of frames with width and offset adjustments
Tilt Shift - simulates a tilt shift lens
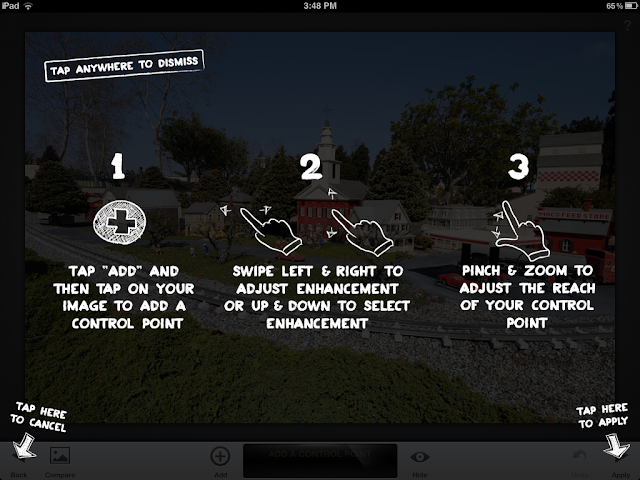
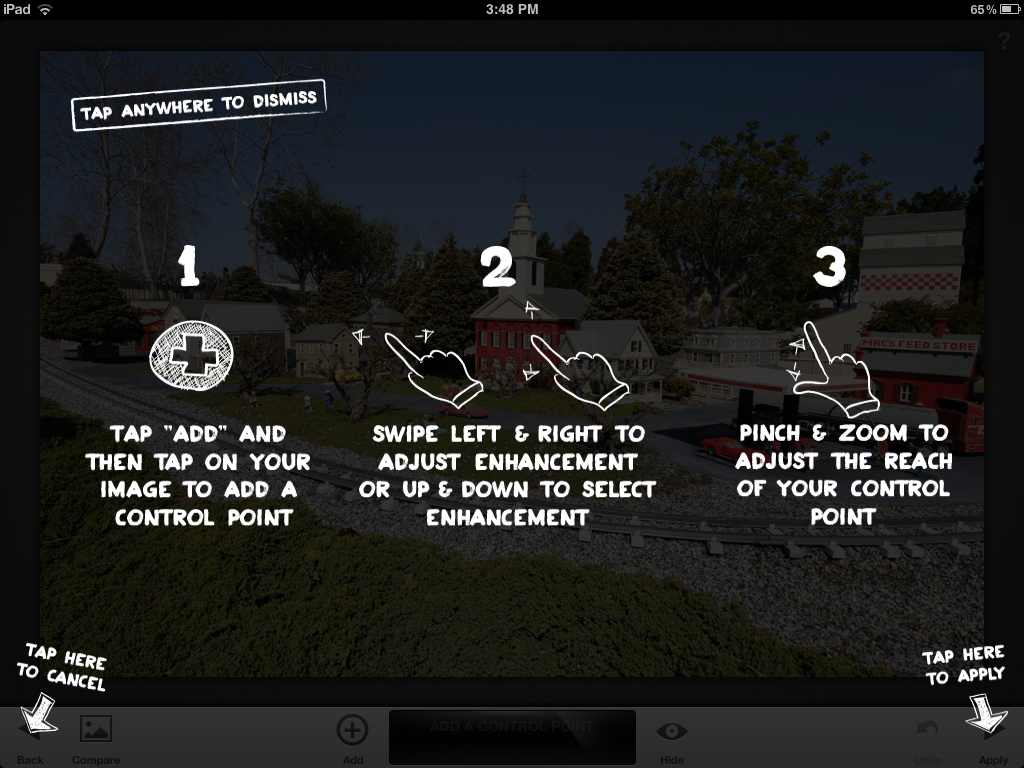
Overall, it's an extremely powerful and very intuitive app. When you launch each filter you get an opaque screen overlay with the instructions and everything uses normal iPad screen gestures. There's a ? in the upper right hand corner of each filter if you need to pull up these instructions again, but after a few times through it you'll be a pro.
Snapseed is a great app for travelling light. Last weekend I was down near San Diego to visit family and took my camera along with my iPad. We spent some time at Legoland (the family that is, but my camera did accompany us) and I grabbed some shots of the miniatures. I spent some time after that playing around with the myriad of creative options that Snapseed offers. Below are few examples that are amazing on two levels: 1) that Snapseed is an awesome app; and 2) that all this stuff was built with Lego!
Original file (jpeg version of the untouched RAW file - that's right, it works with RAW files)

After Tune Image and Selective Adjustments

Vintage Filter + Frames
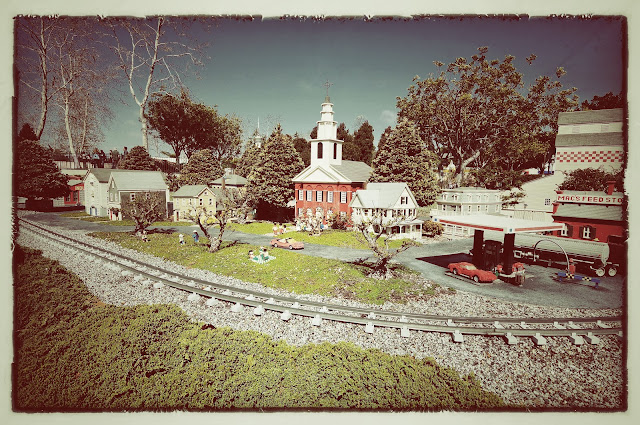
Original file

Black and White + Frames

Enjoy!
DC

So here's a quick overview of what you'll find with Snapseed:
Auto Correct - no thinking required - auto colour and contrast adjustments
Selective Adjustments - talkin' bout control points here...on your iPad... very cool... brightness, contrast and saturation (wish there was a structure option here, too, but alas not yet)
Tune Image - brightness, ambiance, contrast, saturation and white balance
Straighten - self explanatory
Crop - self explanatory
Details - sharpening and structure (both are global adjustments - would love to see these as selective adjustments in a future update)
Black and White - brightness, contrast and grain (combine this with the selective adjustments and you get a mini Silver Efex Pro 2)
Vintage Films - variety of styles and textures along with adjustments for brightness, saturation, texture strength, centre size (vignette), style strength
Drama Filter - variety of styles with filter strength and saturation adjustments
Grunge Filter - styles that range from 0 to 1501 plus texture options, centre size (vignette) that can be placed anywhere also includes brightness, contrast, texture strength and saturation adjustments
Centre Focus - like a vignette with blur where you can control the size and placement
Frames - variety of frames with width and offset adjustments
Tilt Shift - simulates a tilt shift lens
Overall, it's an extremely powerful and very intuitive app. When you launch each filter you get an opaque screen overlay with the instructions and everything uses normal iPad screen gestures. There's a ? in the upper right hand corner of each filter if you need to pull up these instructions again, but after a few times through it you'll be a pro.
Snapseed is a great app for travelling light. Last weekend I was down near San Diego to visit family and took my camera along with my iPad. We spent some time at Legoland (the family that is, but my camera did accompany us) and I grabbed some shots of the miniatures. I spent some time after that playing around with the myriad of creative options that Snapseed offers. Below are few examples that are amazing on two levels: 1) that Snapseed is an awesome app; and 2) that all this stuff was built with Lego!
Original file (jpeg version of the untouched RAW file - that's right, it works with RAW files)

After Tune Image and Selective Adjustments

Vintage Filter + Frames

Original file

Black and White + Frames

Enjoy!
DC
Monday, January 23, 2012
How to Know What Edits to Make?
Now there's a really good question. It's something that I still struggle with for every image that I edit. I've mentioned before that I consider myself a forced creative, in that I mean that creativity is something that I really need to work at to achieve as opposed to being naturally creative. So when I look at editing my images I need some structure to keep me on track.
Before I shoot a scene I try to get an idea of what I want the finished output to look like (the operative word here is "try"). Will it make a good black and white? Does it have a lot of colour that I want to make vibrant? Would HDR be a good choice? This is typically my starting point so that when I upload into Lightroom, where my workflow starts, I already have a pretty good idea of what I want to do.
So here's a brief overview of my workflow and how I break things down for a little bit more structure. I tend to take threefold approach which consists of 1) global adjustments; 2) selective adjustments; and 3) finishing adjustments. Here's what that looks like:
Global Adjustments:
White Balance: Is the image too warm or too cool? Or is there a colour cast? White balance is a good place to start. Auto WB works pretty well on most advanced DSLRs, but sometimes it take a lunch break.
Exposure: Is the image too light or too dark? Whether you set the exposure yourself, or let the camera do it, in some cases they can both be wrong. This is where I use the histogram and clipped highlight/shadow warnings. Try to make sure that you don't have any data leaving the left and right sides of the histogram.
Contrast: Done with either the Contrast slider or the Curves tool. I shoot in RAW format which means that there's no processing done by the camera so a little initial contrast boost can help.
Sharpening: Again working with RAW files means that there's no initial sharpening so I typically do a little bit in Lightroom. However, I always do final sharpening a little later on in my workflow.
Noise Reduction: My ISO is never the same for every image, and sometimes even my lowest ISO setting can show some noise. I always take a quick look and add some noise reduction if necessary. Lightroom has pretty good tool for this.
Selective Adjustments: (These are different for every image, but here's what I look for)
Distracting Elements: Is there anything that needs to be removed? Something that you didn't see in the viewfinder? This is where learning to use the variety of tools in Photoshop can help like the Clone Stamp; Healing Brush; and my personal favourite, Content Aware Fill.
Light or Colour Adjustments: Enhancing specific areas of the image with colour or light. This can help draw the viewers eye into the image directing it to where you want by lightening certain areas and darkening others. Lots of ways to do this with the layer adjustments, layer masks and the brush tool. However, my favourite plug-in for this is Nik Software's Viveza 2.
Contrast Adjustments: I find myself more often than not making selective contrast adjustments to certain areas of an image to bring out more detail. Similar to colour and light adjustments these are done with layer masks and the brush tool.
Selective Sharpening: Things that have a lot of edges can take a fair amount of sharpening; however, if you also have softer areas in the image, you definitely don't want to apply to same amount of sharpening. Portraits are a good example, you want smooth skin, but sharp eyes, so you would only apply sharpening to the eyes in this case.
Finishing Adjustments: (I'm typically back in Lightroom for these)
Vignette: I like vignettes, some people don't, but I do so I add them to pretty much every image. Sometimes it just a slight effect, but it's a nice finishing touch.
Exposure: This kind of bookends my workflow. I'm not sure when I started doing this, but usually after applying the post crop vignette I like to bump the exposure up just slightly to offset the edge darkening that creeps into the centre of the image. Exposure does this a little better than the Feather slider so it's a bit of a balancing act for me.
So there you go. A little peek into my workflow and how I approach my editing. It's taken me a while to get a clear focus on this and it's something that has developed over time. Your workflow may be similar or it could be totally different. All I know is that this works for me. In the end, only you can decide for yourself what is going to work best for you, but if you're still struggling I'll offer these 2 final tips:
1) Learn as much as you can about various Photoshop techniques. Learn the most widely used tools, and learn about using layers and layer masks; and
2) Seek out photographers who are creating the images that you really like. Try to learn how they process their images. With YouTube, blogs, Twitter and other social media options it's not as difficult as you may think find a tutorial or to connect and ask a question.
Sometimes we don't think about the edits that we could, or should be making, because we don't know how to do them, which can become a vicious little circle. So hang in there, learn lots and try new things.
Cheers!
DC
Before I shoot a scene I try to get an idea of what I want the finished output to look like (the operative word here is "try"). Will it make a good black and white? Does it have a lot of colour that I want to make vibrant? Would HDR be a good choice? This is typically my starting point so that when I upload into Lightroom, where my workflow starts, I already have a pretty good idea of what I want to do.
So here's a brief overview of my workflow and how I break things down for a little bit more structure. I tend to take threefold approach which consists of 1) global adjustments; 2) selective adjustments; and 3) finishing adjustments. Here's what that looks like:
Global Adjustments:
White Balance: Is the image too warm or too cool? Or is there a colour cast? White balance is a good place to start. Auto WB works pretty well on most advanced DSLRs, but sometimes it take a lunch break.
Exposure: Is the image too light or too dark? Whether you set the exposure yourself, or let the camera do it, in some cases they can both be wrong. This is where I use the histogram and clipped highlight/shadow warnings. Try to make sure that you don't have any data leaving the left and right sides of the histogram.
Contrast: Done with either the Contrast slider or the Curves tool. I shoot in RAW format which means that there's no processing done by the camera so a little initial contrast boost can help.
Sharpening: Again working with RAW files means that there's no initial sharpening so I typically do a little bit in Lightroom. However, I always do final sharpening a little later on in my workflow.
Noise Reduction: My ISO is never the same for every image, and sometimes even my lowest ISO setting can show some noise. I always take a quick look and add some noise reduction if necessary. Lightroom has pretty good tool for this.
Selective Adjustments: (These are different for every image, but here's what I look for)
Distracting Elements: Is there anything that needs to be removed? Something that you didn't see in the viewfinder? This is where learning to use the variety of tools in Photoshop can help like the Clone Stamp; Healing Brush; and my personal favourite, Content Aware Fill.
Light or Colour Adjustments: Enhancing specific areas of the image with colour or light. This can help draw the viewers eye into the image directing it to where you want by lightening certain areas and darkening others. Lots of ways to do this with the layer adjustments, layer masks and the brush tool. However, my favourite plug-in for this is Nik Software's Viveza 2.
Contrast Adjustments: I find myself more often than not making selective contrast adjustments to certain areas of an image to bring out more detail. Similar to colour and light adjustments these are done with layer masks and the brush tool.
Selective Sharpening: Things that have a lot of edges can take a fair amount of sharpening; however, if you also have softer areas in the image, you definitely don't want to apply to same amount of sharpening. Portraits are a good example, you want smooth skin, but sharp eyes, so you would only apply sharpening to the eyes in this case.
Finishing Adjustments: (I'm typically back in Lightroom for these)
Vignette: I like vignettes, some people don't, but I do so I add them to pretty much every image. Sometimes it just a slight effect, but it's a nice finishing touch.
Exposure: This kind of bookends my workflow. I'm not sure when I started doing this, but usually after applying the post crop vignette I like to bump the exposure up just slightly to offset the edge darkening that creeps into the centre of the image. Exposure does this a little better than the Feather slider so it's a bit of a balancing act for me.
So there you go. A little peek into my workflow and how I approach my editing. It's taken me a while to get a clear focus on this and it's something that has developed over time. Your workflow may be similar or it could be totally different. All I know is that this works for me. In the end, only you can decide for yourself what is going to work best for you, but if you're still struggling I'll offer these 2 final tips:
1) Learn as much as you can about various Photoshop techniques. Learn the most widely used tools, and learn about using layers and layer masks; and
2) Seek out photographers who are creating the images that you really like. Try to learn how they process their images. With YouTube, blogs, Twitter and other social media options it's not as difficult as you may think find a tutorial or to connect and ask a question.
Sometimes we don't think about the edits that we could, or should be making, because we don't know how to do them, which can become a vicious little circle. So hang in there, learn lots and try new things.
Cheers!
DC
Subscribe to:
Posts (Atom)