Friday, December 24, 2010

Wishing Everyone a Very Merry Christmas!


Wednesday, December 1, 2010

Verrazano Bridge Re-Edit


The last photo from my previous post is of the Verrazano Bridge as we were leaving New York on a recent cruise. Taken from our balcony while were moving I didn’t have a lot of time to set-up for composition and exposure as I normally would if I were on land.  The fact that we were not moving very fast helped and allowed me to visualize the composition before I looked through the viewfinder. The other trick that I used was to shoot bracketed exposures to ensure that I would have a few to choose from - there was no going back for this.

There was a nice sunset as a backdrop which I think gives the original image a nice feel, just not the overall feeling that I was hoping for. This is where we can get a little more creative in post production. I wanted this image be a little warmer with more of a silhouette feeling of the bridge. I remembered a similar technique in Scott Kelby’s 7 Point System for Adobe Photoshop book (which is a great book for anyone looking for some simple, but powerful, Photoshop technique).

 For me, everything starts in Lightroom:

I began by increasing the White Balance to almost 14000k, which really warms up the image and provides that overall orange glow I was looking for. Next, I dropped the Exposure close to 2 stops and increased the Blacks slider to around 12, which does 2 things, it darkens the bridge and shore to give that silhouette feeling and increasing the Blacks give a little extra boost to the overall saturation. Next, I increased Clarity to 50, Vibrance all the way up to 100 and Saturation up a little bit to 15. Again, this enhances the warm glow. Finally, since this was a RAW image, I did a little bit of sharpening.

Next, I moved over into Photoshop CS5 and added a Gradient Layer from top to bottom and changed the blend mode to Overlay. Next was a great Lab colour move from Kelby’s 7 Point System for Adobe Photoshop, which adds some great colour boost. Click Image > Mode > Lab Colour to change to Lab mode. Next, click Image > Apply Image; from this panel change the Channel to either “a” or “b” to see a colour boost and choose whichever one you think looks best. Channel “a” targets green and magenta while channel “b” targets blue and yellow. For this image I chose Channel “b”. The colour might look a little harsh at first, but all you need to do is change the Blend Mode to either Overlay or Soft Light to soften the effect. If it still looks too strong you can also lower the Opacity. We’re going for a subtle boost, not wild and crazy colours. I finished with a little more sharpening in CS5 and then back to Lightroom where I added a slight post crop vignette.

I was pleased with the overall result.


Enjoy!

DC

Sunday, November 14, 2010

New York from the Queen Mary 2

Seems like a long time since I have blogged about anything. It's been a busy few weeks. It was vacation time and my wife and I set sail on the Queen Mary 2 the week of October 25th. My wife and I both love to dance and the QM2 has the largest dance floor at sea so it had been on our list for a long time. It always seems crazy busy leading up to vacation; trying get last minute things done at work by tying those loose ends over someone else's desk for a week. Not to mention all of the last minute things to do at home before you head out. However, the time away really does make you feel good and you realize how much you deserved it once you're off.

We boarded the QM2 and found our stateroom on the starboard side, which gave a great view of New York. Sailing out of New York is quite a unique experience because there's so much going on around you. Here are few of the shots I grabbed from our balcony as we were leaving.

We left from Brooklyn Pier 12 from which you get a great view of the city skyline and the Statue of Liberty.


Along with a US Coast Guard escort we also had an NYPD chopper do a low level fly by. I later found out that this is somewhat of a normal occurrence when any of the 3 Queens (Queen Mary, Queen Victoria and Queen Elizabeth) depart New York.


As we approach the Verezzano Bridge it looks like a pretty tight squeeze... at least from this vantage point it does. We actually pass under the bridge with 11 feet between the top of the funnel and the bottom of the bridge. However, once we passed underneath we had a nice view looking back.


Until next time... enjoy!

DC

Thursday, October 21, 2010

Autumn in Ontario

It's autumn in Southern Ontario so I thought I would share a few to show off the some of colours we see here every year.

Enjoy!


DC


Monday, October 11, 2010

HDR Revisited - Part 2

This is the second part of my HDR revisit. Now, I left off the last post with a fairly realistic image of a building. I had mentioned that if this were for a client shoot, they probably would not want their building glowing like something from outer space. However, if that’s the look you’re going for then this is where HDR gets fun.


I chose the building above because I liked the differing lines, texture and colour. However, the initial exposure was kind of flat, as you can see from the original RAW file. That was okay though because with all the building’s attributes I had already decided that this would make a pretty good “wild-side” HDR image.


I purposely pushed things much further than necessary here to show how wild you can go. All you need is some imagination. You can really pull out some texture in the building along with the glowing fantasy look. Probably a little too many halos around the building, but in this case it serves my purpose of playing around with HDR to demonstrate its wilder side.


In the image above I sort of had a few things working against me. The sun was coming up behind the building creating a flat, washed out sky. If I took the exposure down a little bit I would get a better sky, but then the building and foreground would have been underexposed.


Once again, playing around HDR can introduce that fantasy look and completely change the mood of the image. Again, it’s fun to play and see what you can do. I really like the composition, but the blown out highlights and lack of texture in the building needed some work. In this case I think HDR was good choice… well at least it was the fun choice.

HDR can be fun to play with and you can produce some really natural looking images along with some really wild ones. I can see how it can become addicting for some (i.e., wanting to “HDR” every image); however, I still stand behind my rule of restraint. Look for the opportunity to use it and choose the best way to implement.


Cheers!


DC

Sunday, September 26, 2010

HDR Revisited - Part 1

HDR Revisited – Part 1

With the release of Photoshop CS5 earlier this year, and CS5’s enhancement of their HDR Pro function, I thought it would be a good idea to revisit HDR (High Dynamic Range) photography. I have played around with HDR in the past and also wrote a previous blog post with my initial take on using this technique. I also came up with some rules that I would use to determine when and where I would choose to use HDR such as:

Restraint – try to avoid overcooking the image, unless that’s exactly the effect you’re looking for. Try to keep things looking realistic and more pleasing.

Does it really need HDR? – Are there enough tonal values that are outside the range of a normal exposure and would HDR be the best choice?

Composition – This can usually go without saying, but I’ve seen lots of HDR photos where the photographer relied too much on the HDR effect and completely forgot about the composition. Composition is the foundation of every good image so don’t forget about this critical stage.

Now there’s two typical ways to process HDR images: the photorealistic look; and the surrealistic/fantasy look. In this revisit I’m going to show you a little of both starting with the photorealistic look.


The first image above is my original exposure; this is the unprocessed RAW image. When I shot this I knew there were some great elements, but there was also some room for improvement.  As you can see there was a lot going on with the sky, but it looks a little flat. Also, the dark areas of the foreground do not do justice to what I actually saw with my eyes, and the building has a lot of texture in the stones and roof that does not come through. So I thought would this be a good candidate for HDR and set up to shoot multiple exposures.


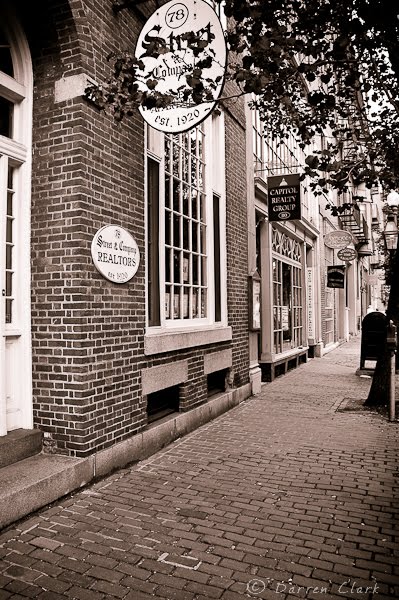
Above is the final HDR output with some finishing in Lightroom. I took 7 exposures (3 under, 3 over and 1 in the middle) and decided on the “overkill” method and used all 7 for the final output. I liked this scene and didn’t want to go too overboard on the HDR effect (Rule #1 – Restraint). My goal was to keep this as realistic as possible, but to also pull out all of the elements that I remembered seeing such as the drama in the sky and the detail in the foreground. Now, I may have pushed this just a little further than I initially intended, but I wanted as much detail in the building as possible, which I think I achieved. Overall, I think this is huge improvement over the original.


Here’s another example of the photorealistic look. I was shooting this at dusk and it was beginning to get dark. This is a typical scene in which there’s a wide range of tones to cover. In order to capture the lighting and detail inside the building I needed to underexpose the image, which as you can see above leaves the foreground still quite dark. In order to capture the foreground I needed to overexpose the image, which has the opposite effect of blowing out some of the highlights. So I thought I would try the HDR route with this one.


This is where HDR can really shine as you can literally get the best of everything.  For this I shot 5 exposures (2 under, 2 over and 1 in the middle) and used all 5 for the final HDR output. I also did a little bit of cleanup on Photoshop and some finishing in Lightroom. Again, my goal was to keep this as realistic as possible. I was thinking that if this were for a client shoot, they probably would not want their building glowing like something from outer space. I was pleased with the final result.

Stay tuned for part 2 where I’ll push things a little more to the wild side.

Cheers!

DC

Thursday, September 9, 2010

Fenway Park, Boston

You can't visit Boston without taking a trip to Fenway Park. Whether you take in a game or take advantage of one of their daily tours, Fenway Park is a must see when you're in Boston. I took one of their daily tours. They take you through the various parts of the stadium from the right field roof deck and the press box to the atop the Green Monster.


Out of all the landmarks in Boston, there’s probably none more popular. One thing is apparent, Bostonian’s love their Red Sox. Fenway Park opened on April 12, 1912, where on opening day the Red Sox beat a team by the name of the New York Highlanders, later known as the Yankees.
 

Fenway is an old time ballpark with a lot of history and character. You can see it in the old wooden grandstand seats, to the lone red seat in the right field bleachers, where Ted Williams plunked a sleeping fan in the head from 502 feet away, and as already mentioned the Green Monster.


This image below is one of my personal favourites; looking out from the Green Monster. I love the perspective of the wide angle lens, and the person near the second base position gives it some scale. 


Enjoy!

DC

Wednesday, September 1, 2010

The Stata Centre at MIT

Down the road from Harvard is the Massachusetts Institute of Technology or MIT as it’s widely known. A stark contrast to Harvard, MIT spreads out among 168 acres that extend more than a mile along the Cambridge side of the Charles River Basin.


MIT is home to one the most unique, and weird, pieces of architecture, the Ray and Maria Stata Centre, designed by Frank Gehry. Now, the first time I saw a photo of this building was in Scott Kelby’s portfolio and I thought it was totally weird then. I was thinking that it would be a cool building to shoot, but it didn’t register with me at the time exactly where the building was, and then I put it out of my mind.


Skip forward to our trip to Boston last year… after the 9 hour drive we were relaxing in our hotel and I was flipping through one of those local city magazines that you usually find in hotel rooms. By complete fluke, I came across a photo of the same building and the article indicating that it was on the MIT campus, a short subway ride from our hotel. Needless to say it immediately went on my “must shoot” list before we left Boston. I love the sharp lines and the contrast between the brickwork and metallic facade. It's a truly unique building, like most Frank Gehry designs.


I spent over two hours walking in and around the building. My first pass was just walking around doing a visual survey to get a sense of the entire building and thinking about how I wanted to shoot it. I also knew that I wouldn’t be back there for some time so I wanted to make sure that I got as much as I could.


Enjoy!

DC

Thursday, August 19, 2010

Did I Mention That I Went To Harvard?

Okay, I was on vacation at the time... So, last time I said that the next post would take us on the search for higher learning… All I needed to do was hop on the T's red line from the Boston Common and head out to Harvard. Established in 1636, it's the oldest educational institution in the United States. Located in Cambridge Massachusetts, Harvard's campus spreads up to 5000 acres, with approximately 20,000 students, 2,100 faculty members and 10,000 academic appointments in affiliated teaching hospitals.


In front of University Hall is the John Harvard Statue, also known as “The Statue of Three Lies”. The inscription reads “John Harvard, Founder, 1638”. However, these statements are not entirely true. The seated figure is not really John Harvard; there were no authentic photos of him so no one really knows if the likeness is accurate. Also, he was not the founder of Harvard, and the College was founded in 1636 not 1638. John Harvard was a young minister who was Harvard’s first benefactor. Upon his death in 1638 he left half his estate to the institution that now bears his famous name.

Right at the centre of everything is Harvard Square; there’s always a lot of activity here.  While I was taking the photo of the building at the corner of John F Kennedy a local tapped me on the shoulder and said I should zoom in on the third floor window... Is it just a little ironic, or just rather amusing, that you’ll find the offices of Dewey Cheetham & Howe on the Harvard campus?


Next time I'll be heading down the road from Harvard for some of my most favourite images so stay tuned.

DC

Thursday, August 5, 2010

A Walk Around Boston Continues

This is the second post of my Boston series. The city definitely has a colonial flair and you can experience the history of Boston by walking "The Freedom Trail". Along the way you will see 16 nationally significant historic sites including the Old State House, the site of the Boston Massacre in 1770, the Old Granary Burying Ground, Paul Revere house and the Old North Church.

Here are a few images from the Freedom Trail.


Boston also has one of the oldest parks in the United States, "The Boston Common". Established in 1634, it covers more than 50 acres. Originally used as a cow pasture, it also held public hangings up until 1817. It’s a much more friendly, active as well as relaxing place now. Adjacent to the Boston Common is the Public Garden, established in 1837, after which the 24 acre landscape was transformed into a botanical paradise. Paths and flowerbeds snake their way around a small lake over which you will find the garden's signature suspension bridge.


Stay tuned, the next post takes us on the search for higher education.

Enjoy!

DC

Thursday, July 29, 2010

A Walk Around Boston


Spent some time in Boston last summer; it’s a great city, especially if you’re a photographer. "A Walk Around Boston" is an appropriate title since my feet took me pretty much everywhere and walking is probably the best way to see Boston. The "T" is probably the next best way to get around. It was the “T” that took me to a few places that were a little too far to walk; I’ll do some follow up posts with those photos over the next little bit.

This is just a start of series I’ll be doing on some my images from in and around Boston. Hope you enjoy!


DC